MineA5 - Complete Hardware and Software Guide
Last Updated: April 19
Hardware Overview
Frontside
MineA5 Frontside
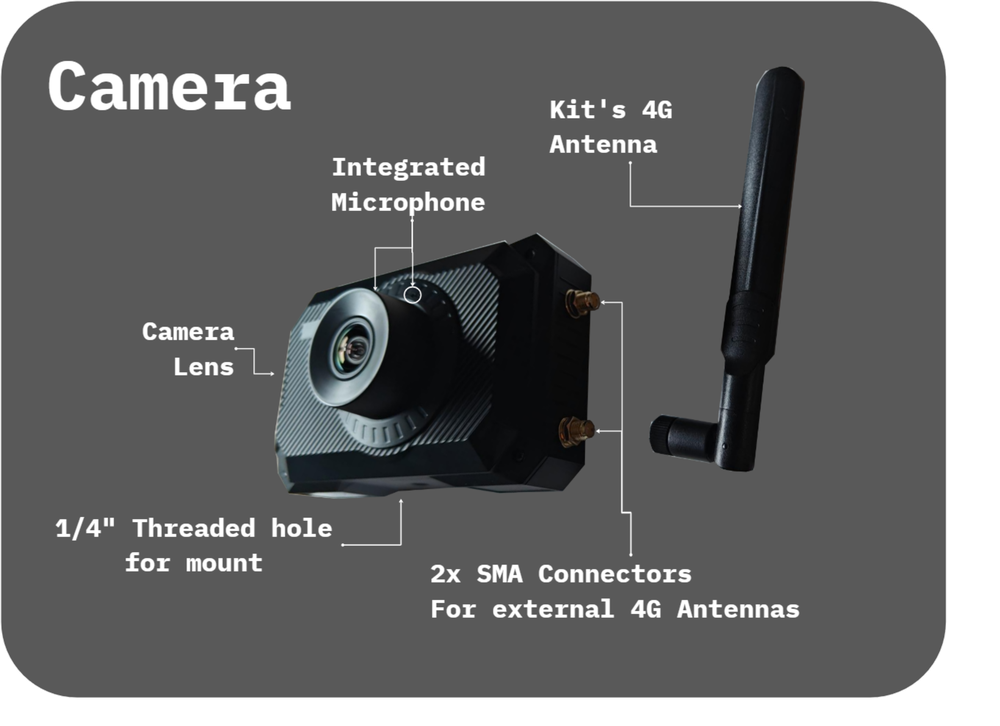
The MineA5 is an all-in-one streaming solution. It films, encodes, and transmits your video feed directly via 4G or Wi-Fi. It supports simultaneous local recording and live streaming, ensuring you always have a high-quality backup of your race saved to the SD card.
The two SMA connectors in the picture are specific to the MyRaces.Live kit and allows to connect different types of 4G antennas based on your needs (e.g., a compact interior antenna, or a high-gain roof-mounted antenna).
Each SMA connector corresponds to a different 4G interface: 4G-1 and 4G-2. These two 4G interfaces can be aggregated/bonded to maximize the upload bandwidth when streaming. Each 4G interface takes a nano-sized SIM card that can be inserted on the side (see “Side Ports” picture).
The camera features a 1/4’’ threaded hole at the bottom for easy mounting. In the MyRaces.Live kit, a full rollbar mount kit is included. It consists of a B-size screw-on ball, a short double socket arm and a roll bar clamp.
The integrated microphone is located on top of the camera barrel (two small holes). Because engine noise and wind flow can saturate the integrated mic, we recommend using the external microphone with the provided foam cover. Place this microphone away from direct wind flow for the best audio quality.
Backside
On the back side of the camera, you’ll find:
The power button to turn the camera on/off.
The record button to start/stop recording.
The touchscreen.

MineA5 Backside
Side Ports
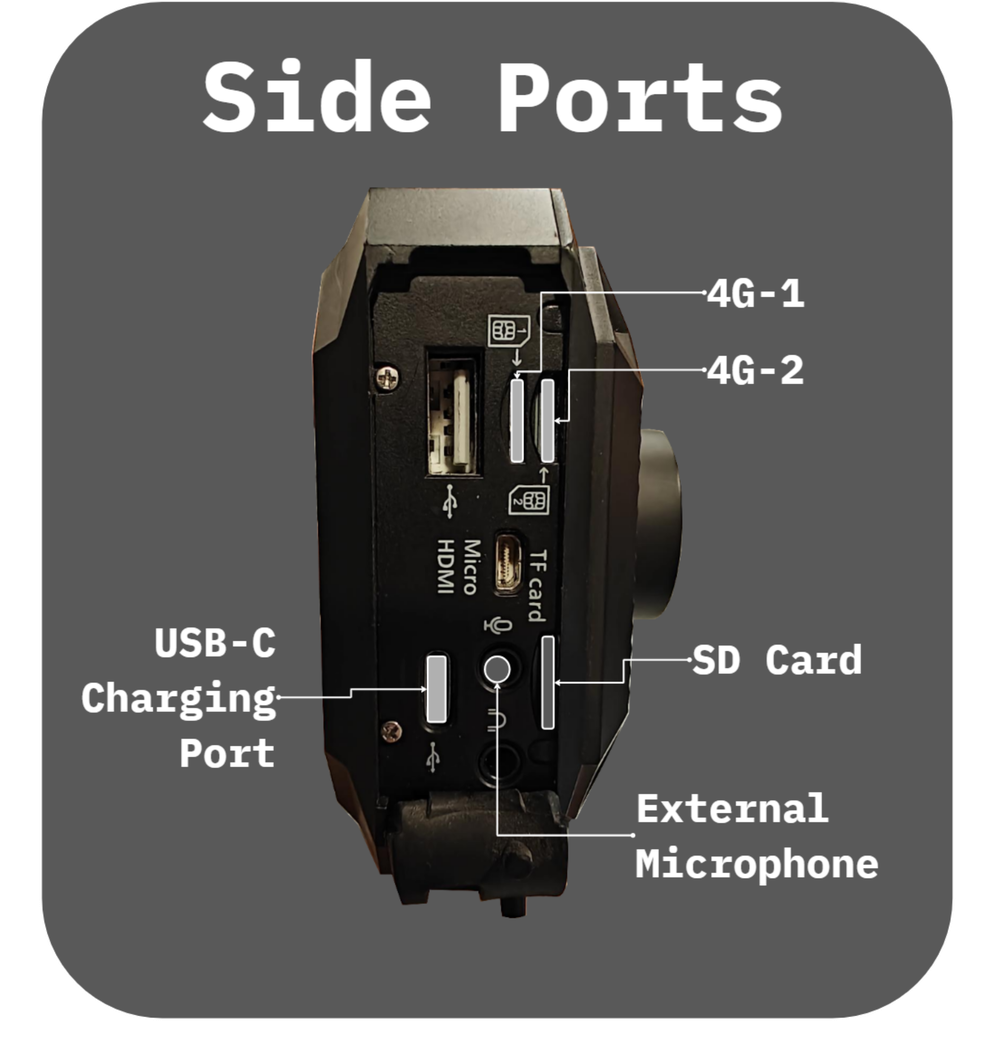
All the ports are located on the side of the camera, opposite to the SMA connectors. Here are the most important ones…
MineA5 Side Ports Detail
The 4G-1 and 4G-2 slots
Insert Nano SIM cards here. You may use either slot for a single SIM setup.
Ensure the external antenna is connected to the corresponding SMA connector (e.g., SIM in Slot 1 requires Antenna on SMA-1).
Note: SMA-1 location depends on the model (can be at the top or at the bottom). To verify where SMA-1 is located, insert your SIM card into 4G-1, power on the device, and check whether the signal reception increases after connecting the antenna to the top SMA or to the bottom SMA.
The USB-C charging port
Charges the camera at 5V 2A.
A charging USB-C cable is provided with the camera.
Consider a hard-wiring to keep the camera charged for long races.
⚠️ POWER WARNING: Do not connect it to a power source higher than 12V (e.g., hardwiring directly to a car battery without a step-down converter), as this could damage the unit.
The TF/SD Card slot
Min Speed is 10MB/s
Min Speed when 4K recording is 30MB/s
FAT32 filesystem for < 64G cards
exFAT filesystem for > 64Gb cards
NTFS filesystem is NOT supported.
The external microphone port
Input for the foam-protected external microphone.
Note: Do not confuse this with the “Audio Out” port.
LED Status
The LEDs on the back left of the camera provide instant feedback on system status.
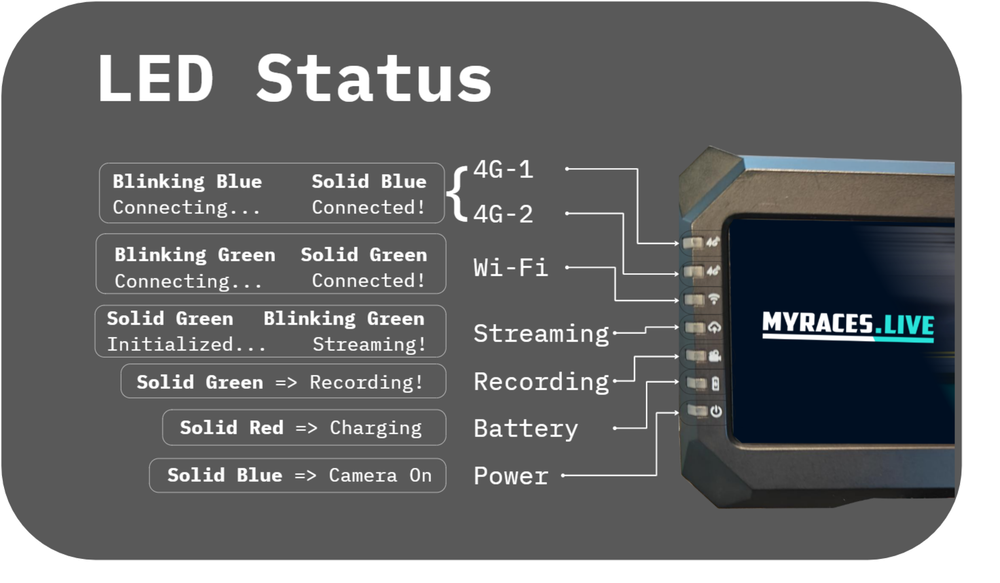
LED Status Indicators
Indicator Issue |
Potential Root Cause |
|---|---|
No Power or Charging Light |
Is the camera powered on? Check battery charge and cable connections. |
4G Network Light Blinking |
Is the antenna connected securely? Is your SIM card activated? Do you have enough signal reception at your location? |
Streaming Light Off or Solid |
Did you forget to “Start Streaming” in the interface? |
Recording Light Off |
Did you forget to press “Start Record” |
User interfaces
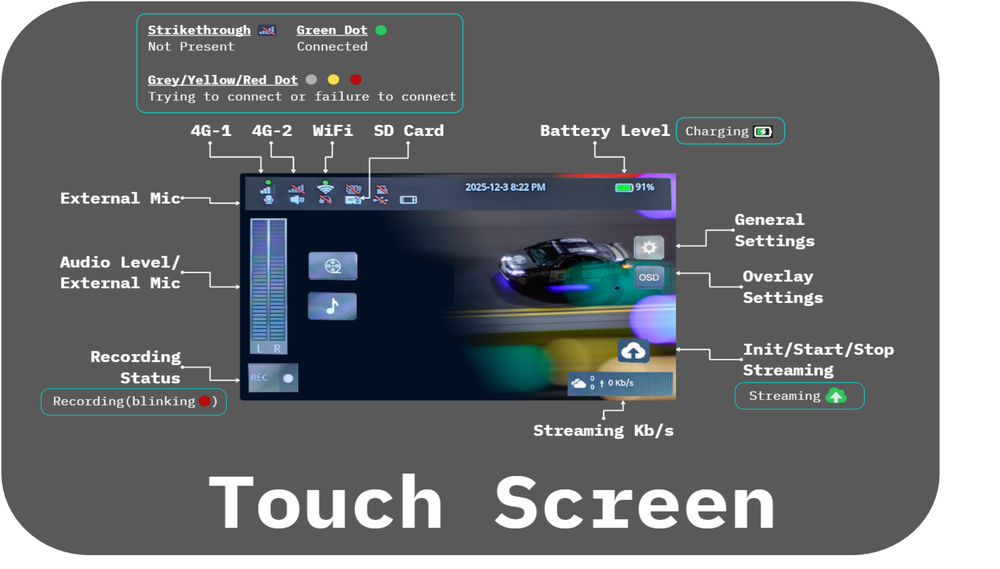
Touch Screen
The touchscreen interface allows you to manage all settings.
- Top Status Bar: Displays hardware and network status.
Grey: No APN found.
Yellow: APN found, attempting connection.
Red: Connected to APN, no data yet.
Green: Connected with data service (Ready to Stream).
Audio Bars (Left): Visual feedback for audio levels. Tap the bars to access the Audio Mixer (enable/disable mics, adjust levels).
Cloud Icon (Right): Configure and Start/Stop your stream(s).
Gear Icon (Right): Access General Settings.
Touchscreen Interface
MLive App/Web Portal
One of the camera’s best features is the ability to control all the settings and start streaming or recording remotely.
Warning
Not to be confused with the MyRaces.Live Portal which used to schedule your Stream Events!
How it works:
- MLive is developed by MineMedia and is available as a phone app (recommended) or as a web portal.
Login: Use the username/password found on the grey sticker in your kit (no account creation needed).
Add Camera: Scan the QR code on the camera or enter the Serial Number.
Control: Once the camera is online, you can manage it from the pits or home.
PS: To have the Web Portal in English, click on the dropdown in the web portal form.
MLive Web Portal
Streaming Channels
Channels: Local vs. Aggregated
Local Channel: Use this if you have a single SIM card.
Aggregated (Bonded) Channel: Use this if you have two SIM cards (e.g., Verizon + AT&T) and want to combine them for better stability.
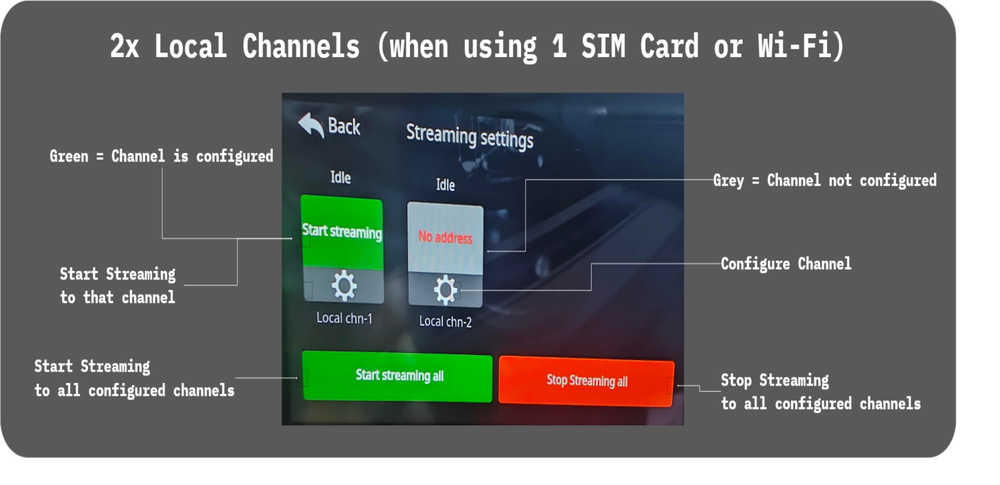
Local/Single Channels
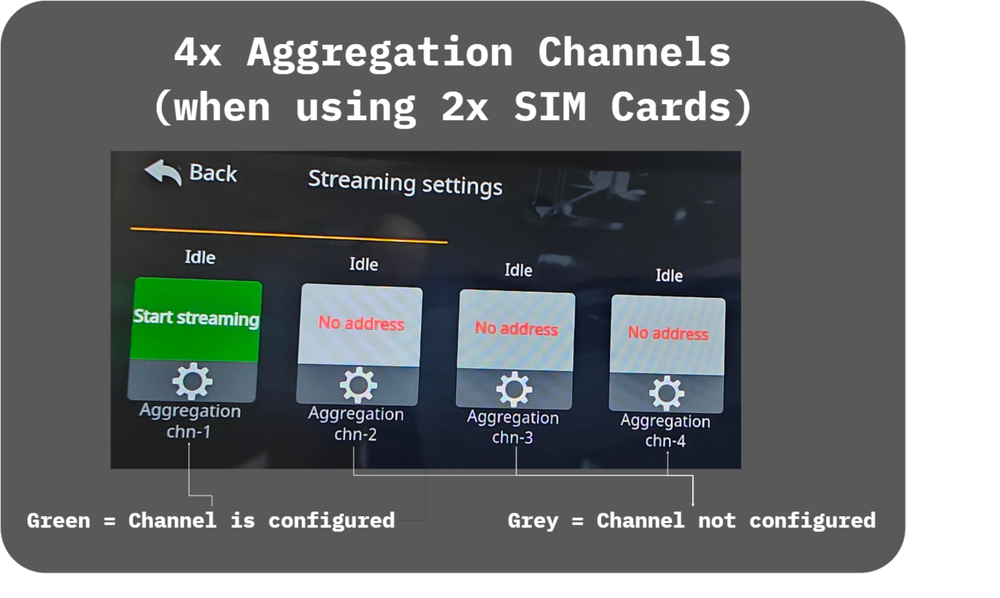
Aggregated Channels
Note
Why is there multiple channels (e.g. Local chn-1 and Local chn-2)? The MineA5 supports configuring and streaming to multiple destinations simultaneously; however, because this also increases the bandwidth requirements (you double them if you use two channels), we recommend streaming to a single destination (e.g., MyRaces.Live) and using cloud restreaming services to restream to other YouTube/Twitch/Facebook accounts if desired.
Click on the Gear Icon to configure the channel with a streaming destination. You can either enter the information manually (streaming URL and code) or, you can scan the MyRaces.Live generated QR Code to fill in the information automatically.
Click on “Start Streaming” and “Stop Streaming” to start/stop streaming on a given channel.
Streaming and Recording Settings
Streaming Resolution & Bitrate Guide
We ship cameras pre-configured with good-all-around streaming settings: H.264/720p / 30fps / 2500Kbps.
If you have a strong connection at the racetrack, you can increase the resolution and FPS (for example, to 1080p and 60FPS).
Likewise, if you have a bad connection at the track, consider reducing the resolution and FPS (480P and 30FPS).
If you have limited bandwidth at the track, you can also consider streaming with H.265/HEVC encoding (instead of H.264).
Changing the encoding, streaming resolution or FPS cannot be done if the camera is currently streaming.
Stop the stream if it’s currently streaming
Adjust the encoding, streaming resolution, FPS and bitrate accordingly (see table below)
Start the stream again
If you are streaming to MyRaces.Live, make sure to:
1. Adjust the settings of your Stream Event accordingly BEFORE YOUR EVENT GOES LIVE, so that we can restream your video with the matching resolution (720p or 1080p) to your YouTube channel and other destinations. (see Streaming at 1080p and/or 60fps? for instructions). 2. Create and select a Custom Overlay with that resolution (720p or 1080p) to make sure your overlay looks good on the stream.
Resolution & FPS |
Recommended Bitrate |
|---|---|
1080p 60fps |
5000 Kbps |
1080p 30fps |
4000 Kbps |
720p 60fps |
4000 Kbps |
720p 30fps |
2500 Kbps |
480p 30fps |
2000 Kbps |
360p 30fps |
1000 Kbps |
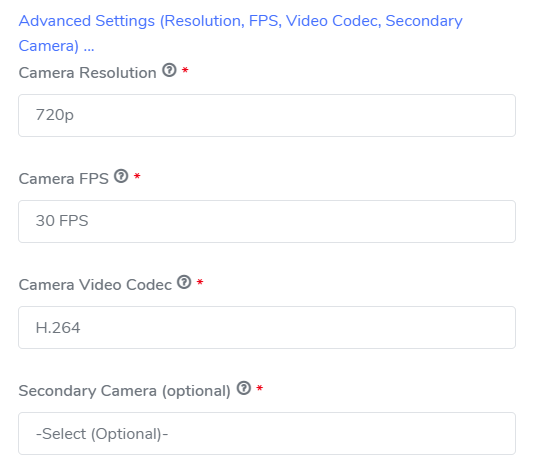
MyRacesLive Stream Event > Camera > Advanced Settings
MyRacesLive Stream Event Camera Advanced Settings
Note that your streaming resolution can be different than your recording resolution. You can stream at 720p, and decide to record your video locally at 1080p.
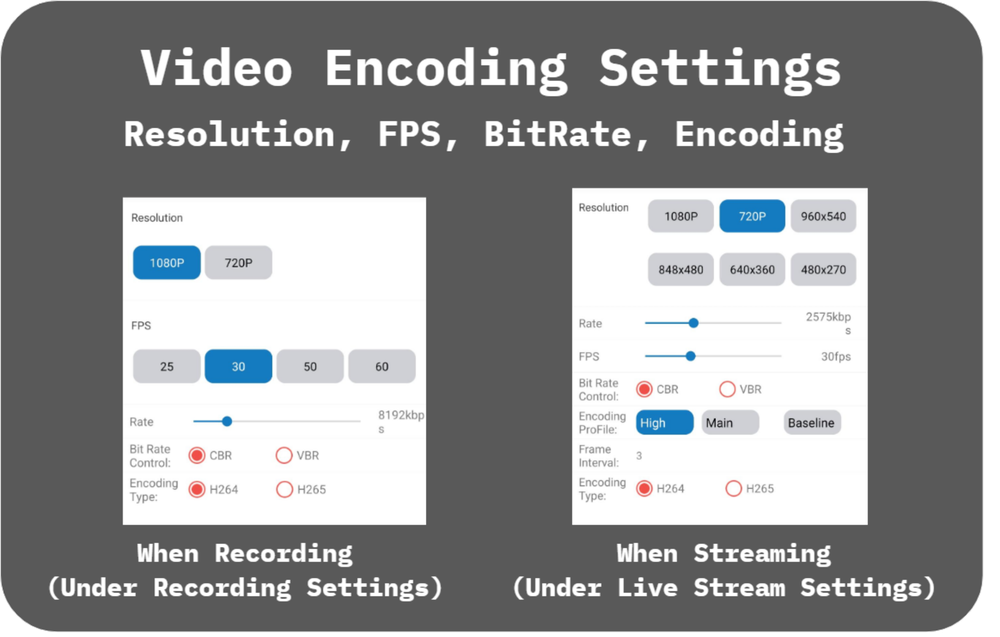
Resolution Settings
Streaming Settings
Where to change settings:
On Camera Touchscreen: General Settings > Venc > Live
On MLive App: More Settings > Live Stream
Using H.265/HEVC encoding
Where to change settings:
On Camera Touchscreen: General Settings > Venc > Live > Encoding Type (scroll down to the bottom of the page)
On MLive App: More Settings > Live Stream > Encoding Type
Recording Settings
To change the recording resolution:
On Camera Touchscreen: General Settings > Venc > Record
On MLive App: More Settings > Record Stream
Note
The recording resolution can be the same or higher than the streaming resolution, but not lower. For example, if you stream at 720p, you can record at 720p or 1080p, but not at 480p.
To change the recording FPS and bitrate:
On Camera Touchscreen: General Settings > Venc > Record
On MLive App: More Settings > Record Stream
Start/Stop and Auto-Start Recording
Before you start recording, make sure you have an SD card inserted.
You can start/stop recording manually or enable the camera to automatically start recording to the SD card whenever it powers on.
To start/stop recording manually, simply long press on the “Record” button on the back of the camera.
To verify it’s recording:
check the “Recording” LED on the back left of the camera. It should be solid green when recording and off when not recording.
You can also check the recording status from the touchscreen home screen. If you see a red dot on the bottom left of the screen, it means it’s recording.
To start/stop recording manually from the MLive app:
click on “More Settings” > Recording (bottom of the page)
Enable the “Recording” toggle.
To enable auto-start recording on power on, from the touchscreen:
Go to Settings > General > Record
Enable “Auto Record on Power On”
Select whether to stop when full or to overwrite old footage when the SD card is full
Click “Confirm”
Now, whenever you power on the camera, it will automatically start recording to the SD card.
Checking the files and space left on your SD card
From the touchscreen, go to Settings > Storage and Select “TF Card” in the drop down menu to see the files recorded on your SD card and how much space is left.
Image Zoom, Flip, and Contrast
Some camera image settings are common to both streaming and recording and are located here:
On Camera Touchscreen: General Settings > Camera
On MLive App: More Settings > Camera Set
Camera Zoom
If you cannot mount the camera close enough to the windshield, but you’d still want to see more of the track, you can try using the Zoom 1X:
On Camera Touchscreen: General Settings > Camera
On MLive App: More Settings > Camera Set
Important
Use Zoom with caution because it reduces the video quality.
Camera Zoom Setting
Video Flipping
Use the video flip option to flip the image when mounting the camera upside down:
On Camera Touchscreen: General Settings > Camera
On MLive App: More Settings > Camera Set
Video Brightness/Contrast/Hue/Chrome
On Camera Touchscreen: General Settings > Camera
On MLive App: More Settings > Camera Set
We recommend leaving these settings with their default values.
Adjust the contrast down when there’s too much contrast between the inside of the car and the outside the car, making the outside “too bright”.
If the above doesn’t help at all and the outside is still “too bright”, try moving the camera closer to the front windshield so there’s less “inside of the car” and more focus on the windshield. If that’s not an option, you can try zooming in x1 and see if it helps.
Adjust the contrast up during the night.
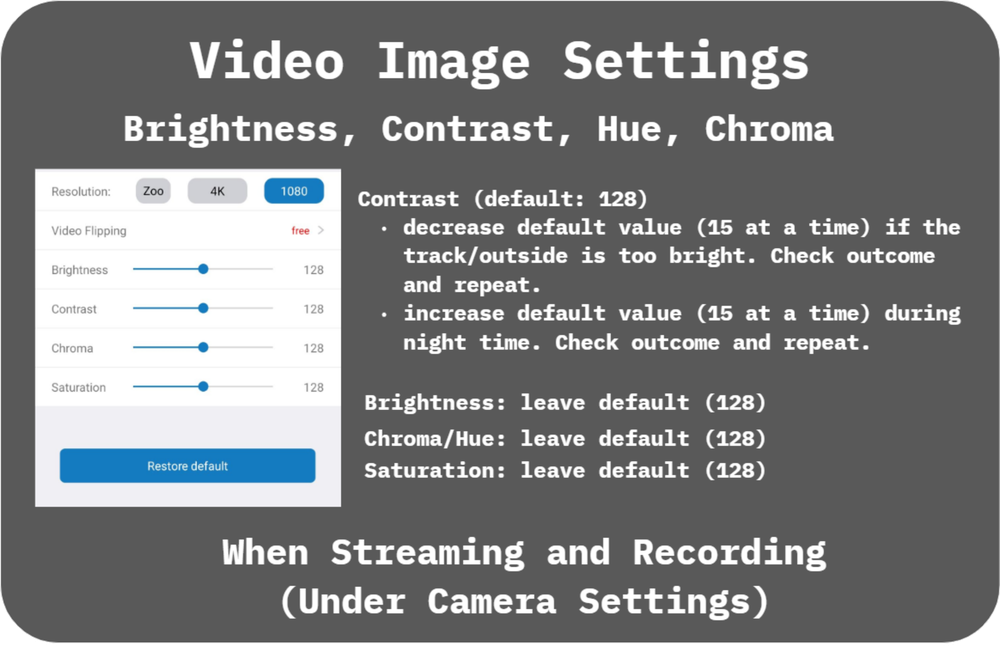
Brightness and Contrast Settings
What you see |
What you should do |
|---|---|
The outside is “too bright” |
Decrease Contrast. If it doesn’t help: move the camera closer to the windshield. If it doesn’t help: try zooming in (ZOOM x1 option under the camera settings). |
Everything is “too dark” (nighttime) |
Increase contrast |
Turn on Hotspot Mode
To enable the camera’s hotspot mode and use it as a Wi-Fi hotspot for other devices in the car:
Go to Settings > Network > Router
Turn On “Network Sharing”
Select “WAN”: 4G-1 or 4G-2 (based on where your SIM card is inserted)
Turn On “WiFi HotSpot”
Set the Hotspot Name and Password that will be used for other devices
Click “Confirm”
Other devices can now connect to your Camera’s WiFi Hotspot using the hotspot name and password provided.
Camera Firmware Upgrades
How to know there’s a new firmware version available?
When the camera has Internet access, it automatically checks for any available firmware versions.
If a new version is available, a red dot is displayed on top of the “Settings” icon in the home screen. Follow this red dot into the Settings Menu > General > Upgrade.
Upgrade Steps:
Make sure your camera is powered or has enough battery before starting an upgrade.
Make sure your camera has a good Internet connection to allow the download of the new firmware image.
Start the Upgrade by clicking on “Downloading and Installing” and clicking “Yes” to confirm.
The camera will start by downloading the new image and then will reboot to upgrade.
If the download fails:
Try again
Try again after connecting to a better local Wi-Fi
Try again after making sure your Internal Storage is empty (go to Settings > Storage and delete any personal files you may have in the “Internal Storage”)
What’s new in firmware version 1.0.2.6 (March 2026)?
Added Support for Single Network Routing Function
Use Case:
- The camera can now act as a Wi-Fi hotspot for other devices in the car
Connect your telemetry streaming devices to the MineA5 hotspot (ex: Autosport Labs Podium Connect)
Connect another streaming camera to the MineA5 hotspot (for filming another position/angle). For example: stream with a secondary MineA5 or Yi4K.
See Turn on Hotspot Mode for instructions on how to turn on the hotspot mode.
Warning
Your camera’s 4G upload bandwidth will now be shared with any additional devices connected so make sure your connection can support it.
Added Support for auto-recording on Power On
Use Case: Never ever forget to start recording your race to your SD card!
See Start/Stop and Auto-Start Recording for instructions on how to enable it.