Configuring your Stream Destinations
Last Updated: April 19
How streaming works on MyRaces.Live
MyRaces.Live does not host your live streams on its own servers. Instead, the platform sends your camera feed to the streaming destination(s) you configure — such as your own YouTube channel or a custom RTMP/RTMPS destination (Twitch, Facebook, Instagram, etc.).
What this means for you:
You must have at least one connected YouTube channel or one custom RTMP destination configured before you can schedule a stream event.
Your live streams and replays are hosted on your own YouTube channel or the platform of your choice — you have full control over your content.
The platform automatically manages YouTube Lives on your connected channel(s): creating, starting, and stopping them in sync with your stream events.
When using static RTMP destinations (RTMP URL and Key to YouTube, Twitch, Facebook, Instagram, etc.), you will need to manage your live streams manually on those platforms (start/stop streams, handle 12-hour limits, etc.).
Here’s how the streaming destinations compare between subscription tiers:
All users can save up to 3 custom RTMP destinations under Stream Destinations > RTMP Destinations. The number of destinations that can be used per stream event depends on your subscription:
Basic (Free) |
1 destination per stream (Connected YouTube channel or YouTube RTMP destination) |
Premium |
1 destination per stream (Connected YouTube channel or any RTMP/RTMPS destination) |
Pro |
Up to 3 destinations per stream (any combination of connected channels and RTMP/RTMPS destinations) |
Streaming to your own YouTube account
Enabling live streaming on your YouTube account
Using your laptop, go to YouTube Studio (do no try to do this from your phone, it won’t work).
Make sure the account you’re logged in with is the one you want to stream from. If not, switch to the correct account by clicking on your profile picture in the top right corner then “Switch account”.
Once on the correct account, click on “Create” (camera icon with a plus sign) in the top right corner.
Then, select “Go live” to access the YouTube Studio live streaming dashboard.
Follow the prompts to enable live streaming if you haven’t already.
Note
There is no minimum subscriber requirement to live stream to your YouTube Channel when using a streaming software. However, you do need to request it and it can take up to 24 hours to process so it’s recommended to do it in advance.
“Connected YouTube” vs “Manual YouTube Stream Key”
Comparison table between option A (Connected YouTube) and option B (Manual YouTube Stream Key) as it stands today:
Option A: Connect your YouTube Account |
Option B: Manual YouTube Stream Key |
|
|---|---|---|
Setup Complexity |
Easy: Connect your YouTube account once, then select it for each stream event. |
More complex: You need to create a YouTube Live for each stream event. |
Stream Management |
Automatic: MyRaces.Live platform automatically creates, starts, and stops YouTube Lives in sync with your stream events. |
Manual: You need to stop each YouTube live manually in YouTube Studio. |
Handling 12-hour Limit |
Automatic: MyRaces.Live platform automatically splits long streams into multiple parts to handle YouTube’s 12-hour limit. |
Manual: You need to monitor your stream duration and manually stop and restart the stream before the 12-hour mark to ensure your replay is archived. |
Links to YouTube Lives |
Are created and available when the stream event goes live. You can point your audience to your YouTube Channel in the meantime. |
You can create the YouTube Lives as early as you want and share the links in advance. |
Thumbnail Customization |
You can change the thumbnail once the stream is over. |
You can select a custom thumbnail when you create the YouTube Live in YouTube Studio |
Title Customization |
The title of your Stream Event is used for the YouTube Live broadcast. You can change it in YouTube Studio at any time. |
You set the title and description manually in YouTube Studio for each YouTube live. |
Visibility Control |
You can choose the visibility of your YouTube Live (Public, Unlisted, Private) when scheduling your stream event. We will honor and keep the visibility in sync until the event is past. |
You manage the visibility manually in YouTube Studio for each YouTube live. |
Note
Note that as we get more user feedback, we may start developing more capabilities around the connected YouTube Account.
Option A: Connect your YouTube Account (Recommended)
The easiest way to stream to your YouTube channel is to connect it directly to the MyRaces.Live platform. Once connected, the platform will automatically create, start, and stop YouTube Live broadcasts on your channel — no manual stream key management needed.
1. Make sure your channel is set as your default channel
If you have multiple YouTube channels under the same account, make sure to set the one you want to stream from as your default channel:
Go to your channel account page YouTube Channel Account Page
Click on “Advanced Settings” in the left menu.
Check the field called “Default channel”: if it’s not checked, check the box to “Make this my default channel”.
2. Connect your YouTube account to MyRaces.Live
Always first make sure the YouTube channel you want to stream to is set as your default channel and enabled with live streaming.
Then, follow these steps to connect your YouTube account to MyRaces.Live:
In the MyRaces.Live portal, go to Stream Destinations > YouTube Channels.
Click “Connect My YouTube Account”.
You will be redirected to Google to choose an account to connect.
After selecting your account, you have to authorize MyRaces.Live to manage live streams on your channel.
Once authorized, the default channel associated with your account will appear in the list of connected accounts.
Note
You may see an “unverified app” warning during the authorization process. We are actively working to complete the verification with Google, but in the meantime, you can safely proceed with the connection by clicking on “Advanced” and then “Go to MyRaces.Live (unsafe)”. See YouTube Integration Privacy Policy for more details on what operations we perform on your channel and how we handle your data.
3. Verify your connection
In the connected accounts list, click the “Test Connection” button next to your channel.
A successful test confirms that your connection is healthy and that live streaming is enabled on your channel.
Tip
If the test fails with a “live streaming not enabled” error, go back to YouTube Studio and follow the steps to enable live streaming. You may need to wait up to 24 hours for activation.
4. Select your connected channel when scheduling a stream event
When scheduling or updating a stream event, under “Stream Destinations”, check the box next to your connected YouTube channel.
Select the Visibility for your YouTube Live: Public, Unlisted, or Private.
The Stream Name you enter will be used as the title of the YouTube Live broadcast.
That’s it! The platform handles the rest — your YouTube Live will be automatically created when the stream event starts, and automatically stopped when it ends.
Note
The platform also automatically handles the YouTube 12-hour archive limit by splitting long streams into multiple parts.
Option B: Manual YouTube Stream Key (Legacy)
If you prefer to manage your YouTube lives manually, you can set up a custom RTMP destination instead of connecting your YouTube account.
1. Schedule and configure a YouTube stream manually
Sign in to your YouTube account.
Click the Create icon (camera with a plus sign) at the top right of the page.
Select Go Live.
In the left menu, select “Manage” (calendar icon), then click on “Schedule Stream” in the top right corner.
Schedule a YouTube Stream
Tip
DO NOT use the “Stream” action (which you access when clicking on the “Stream” icon in the YouTube Studio). Using the “Schedule Streams” workflow will allow you to access important additional settings, such as enabling auto-start and disabling auto-stop (see below).
- Follow the prompt to create a new stream:
Enter a title and description
Select “Streaming Software” as the broadcast type for your stream
Enter your preferences for the customization and visibility
Enter the date and time you want to go live
Click “Done”
- Open your Stream:
Click on the “Stream Settings” tab under the preview window.
- Set “Enable Auto-Start” to ON
So that the stream automatically goes live when you start sending data)
- Set “Enable Auto-Stop” to OFF
So that the stream won’t automatically end if you stop sending data for a short period, as connection drops may happen at race tracks.
Click on “Copy”, next to the Stream Key to copy it to your clipboard, you will need it for the next step.
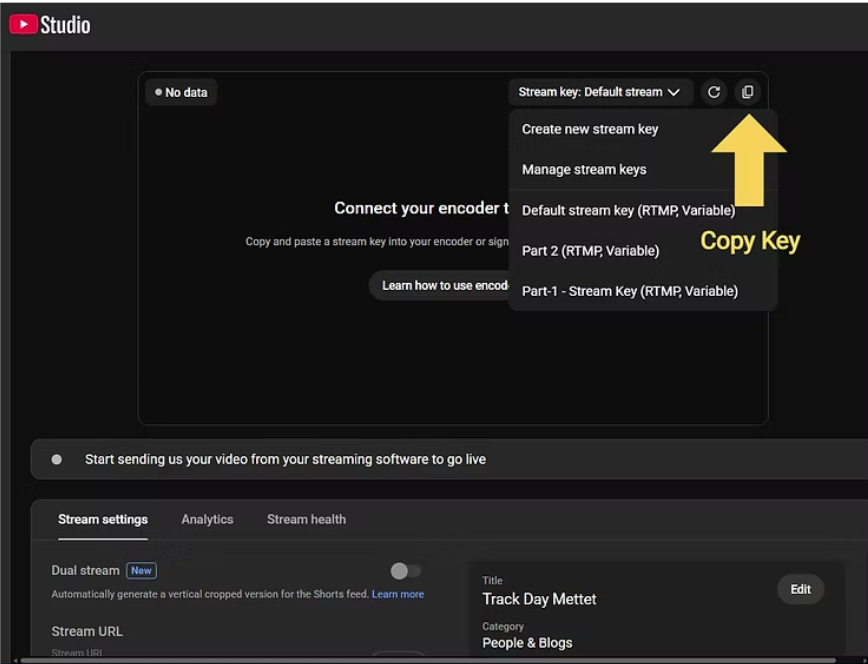
Copy Stream Key
Note
Make sure to copy the Stream Key and the Stream Key only. It should look like this: “1a2b-3c4d-5e6f-7g8h”.
Tip
Because YouTube doesn’t provide a way to automatically stop a stream at a specific time, you will have to manually stop the stream. Make sure you do so before the 12-hour mark if you want to keep the replay of your stream available on your YouTube channel.
2. Add YouTube as a custom RTMP destination in MyRaces.Live
Navigate to Stream Destinations > RTMP Destinations in the portal. From there, you can set up a destination and then use that destination for any subsequent Stream Event:
To configure a new stream destination:
Optionally enter a destination name, for example “My YouTube Account”
Select the type of service you want to stream to, in this case, “YouTube”
The Stream URL is auto-populated based on the service you select.
Paste your previously copied YouTube Stream Key there.
Click Save
When scheduling or updating your Stream Events, you can now select your custom Stream Destinations.
3. Make sure to stop the stream when you’re done
Because YouTube doesn’t provide a way to automatically stop a stream at a specific time, you have to manually stop the stream before the 12-hour limit.
Tip
If you prefer not to worry about manually stopping streams and handling the 12-hour limit, consider using Option A: Connect your YouTube Account instead — the platform handles all of this for you automatically.
4. How to handle > 12 hours of streaming on your own YouTube channel?
Note
If you are using Option A: Connected YouTube, the platform handles the 12-hour limit automatically by splitting your stream into multiple parts. No manual action is needed.
If you are using Option B: Manual Stream Key, you will have to manually stop the stream in your YouTube Studio before the 12-hour mark, then immediately start a new stream reusing the same settings (more specifically, reusing the same Stream Key).
No change is needed on the MyRaces.Live portal as long as the same Stream Key is used.
Streaming to Twitch, Facebook, or Instagram
With the Premium and Pro subscriptions, you can also stream to any custom RTMP/RTMPS destination, including Twitch, Facebook, or Instagram.
To stream to one of these platforms:
- Copy the streaming key from the streaming platform of your choice:
Twitch Studio
Facebook Producer
Instagram Live
- Navigate to Stream Destinations > RTMP Destinations in the portal to create a new destination
Select the service
Paste your streaming key and click “Save”
When scheduling or updating your stream event, select your custom RTMP destination(s) under “Stream Destinations”.
Here’s how each of these popular streaming platforms works, and how they compare concerning their restrictions on live duration, visibility options, access to replays, and more:
1. YouTube Studio
Link to the software? |
|
Available on Phone or Desktop? |
Desktop Only |
Start/Stop Mechanisms |
Option to schedule the start and to enable auto-start when the feed starts. Option to schedule auto-stop when the feed stops. You must remember to manually stop the stream if you turned off auto-stop. |
Replay Video Availability |
Always available as long as the live duration was less than 12 hours. Videos of longer streams do not get archived. |
Max Stream Duration |
No known limit, you can live stream for as long as you want (with some restriction on the availability of the replay if the stream is > 12 hours). |
Live Stream Visibility Options |
You can choose between public, unlisted, or private. |
2. Twitch Studio
Link to the software? |
|
Available on Phone or Desktop? |
Desktop Only |
Start/Stop Mechanisms |
No ability to schedule your stream, you go live as soon as you start streaming to your stream key. The live stream stops when you stop sending the stream signal. Every start/stop sequence creates a new live stream. |
Replay Video Availability |
Past broadcasts are saved for a limited time based on your account type: 60 days for Partners, Prime, and Turbo users; 14 days for Affiliates; and 7 days for other broadcasters. |
Max Stream Duration |
48 hours for a single continuous live stream. The stream automatically disconnects after 48 hours, but you can restart it immediately. |
Live Stream Visibility Options |
Always public (available to all viewers) to your channel followers/subscribers. |
3. Facebook Producer
Link to the software? |
|
Available on Phone or Desktop? |
Desktop Only |
Start/Stop Mechanisms |
Ability to schedule your stream with a given start and end time. You can also manually click “Go Live” to start the broadcast on Facebook. You click “Finish” to end the live stream. |
Replay Video Availability |
Live videos are typically saved to your page/timeline as a standard video after the stream ends. |
Max Stream Duration |
Standard Facebook Live: 8 hours. Facebook Gaming: 12 hours. Streams automatically end when the limit is reached. |
Live Stream Visibility Options |
You can stream to your timeline, a Page you manage, or a Group you’re in. You can set the privacy (e.g., Public, Friends, Only Me) on a profile stream. |
4. Instagram Live
Important
For Instagram, we currently only support streaming to 1 account at a time per Stream Event (you cannot restream to multiple Instagram accounts at the same time for the same event).
Restrictions: You need a Professional Instagram account to go live with a live streaming camera that is not your phone (or when streaming from an external software like MyRaces.Live)
How to get an Instagram Professional Account: * Open Instagram.com on your desktop. * Click ☰ More. * Click Settings. * Scroll and click Account type and tools. * Click Switch to professional account. * Follow the prompts to customize your account, then click Done.
Link to the software? |
Open Instagram.com on your Desktop, then click on “Live Video” option under “Create [+]” on the left. |
Available on Phone or Desktop? |
Desktop Only |
Start/Stop Mechanisms |
You manually click “Go Live” to start and “End” to stop the broadcast from Live Producer on the desktop. No ability to schedule a stream. |
Replay Video Availability |
Live streams can be saved to your Live Archive if enabled. After the stream ends, you have the option to share it as a Reel or share a replay to your Story (available for 24 hours). Open the Instagram app, go to your profile, tap the Menu icon, and then select Settings and privacy, Archiving and downloading. Finally, toggle on Save live to archive. This setting must be enabled before your live stream starts. |
Max Stream Duration |
Maximum Duration: 4 hours for Creator accounts. Other Accounts: Personal and Business accounts may have a 1-hour limit for live streams. Streams exceeding this limit may automatically end. |
Live Stream Visibility Options |
You can choose between Public, Practice (private), or Close Friends before going live. |