MyRaces.Live Streaming Kit
Activating your SIM Card
The MineA5 requires a physical nano-size SIM card. E-SIMs are not supported.
Tip
If you are an existing Verizon customer, we recommend you to text or call our Verizon partner Eric Kaul to get your SIM card activated.
Choosing a mobile data plan
For the best streaming experience, look for a plan that offers:
High-speed 4G LTE data
High network priority — avoid plans that deprioritize data during congestion (e.g., cheap prepaid cards).
Sufficient data allowance — An unlimited plan is ideal if you stream frequently. Live streaming at 720p, 30FPS uses approximately 1–1.3 GB per hour of streaming. A 10 GB plan would allow for roughly 8–10 hours of streaming.
Tested providers:
USA: Verizon, AT&T, T-Mobile
Australia: Telstra
Belgium: Spectrum, Proximus, Telenet
Brazil: Claro
Warning
Bell and Telus SIM cards (Canada) are known not to work directly in the MineA5. Canadian users should either use a US SIM with free roaming enabled, or connect the camera to an external hotspot over WiFi (see Connecting your camera to a local WiFi).
If your provider is not listed above, it may still work — the MineA5 is compatible with most 4G LTE networks worldwide. We recommend testing the SIM in the camera before race day.
How to activate
Most mobile carriers will not recognize the MineA5’s IMEI, so you need to activate the SIM card against a regular smartphone first, then transfer it to the camera.
In-store activation:
Visit your carrier’s store (AT&T, Verizon, T-Mobile, or your local provider).
Ask for a mobile data plan for your personal phone.
Select a 4G LTE plan with high speed and priority.
Once the SIM is activated and working in your phone, transfer the nano SIM to the MineA5.
Online activation:
Go to your carrier’s website and choose the “Bring your own phone” option.
Use your current smartphone’s IMEI to activate the plan.
Order a physical nano SIM (not an e-SIM).
Once the SIM arrives and is activated in your phone, transfer it to the camera.
Note
If your SIM card is locked by a PIN code, remove the PIN before transferring it to the MineA5. Insert the SIM into your phone first, go to the Security settings, and disable the SIM PIN.
Charging the camera
Charges the camera at 5V 2A.
A charging USB-C cable is provided with the camera.
Consider a hard-wiring to keep the camera charged for long races.
⚠️ POWER WARNING: Do not connect it to a power source higher than 12V (e.g., hardwiring directly to a car battery without a step-down converter), as this could damage the unit.
Connecting your camera to a 4G network
Insert your activated SIM card into one of the two available slots (if the card doesn’t stay in place, it’s likely inserted the wrong way).
- If you have a MineA5 version 2.0:
Attach your external 4G antennas on the side (L-shaped, or rooftop).
- Make sure you attach the antenna to the correct SMA connector:
On some units, the bottom SMA connector is for the SIM Card Slot 1, and on other units, the bottom SMA connector is for SIM Card Slot 2.
The only way to be sure is to look at the signal strength (top left of the touch screen) going from 1 bar to 3/4 bars after you have attached the antenna.
If the signal strength remains at 1 bar, connect the antenna to the other SMA connector.
A long press on the power button will turn on the camera and bring you to the main screen area:
Wait for the camera to connect to the 4G network and get data service. Look at the 4G network service icon in the top-left corner:
Good signal strength should be at least 3 bars.
Wait for the dot above the signal bars to turn green (grey or red means there’s no data service yet).
Check the 4G LED turns solid blue (a blinking blue LED means the camera is trying to connect to the network).
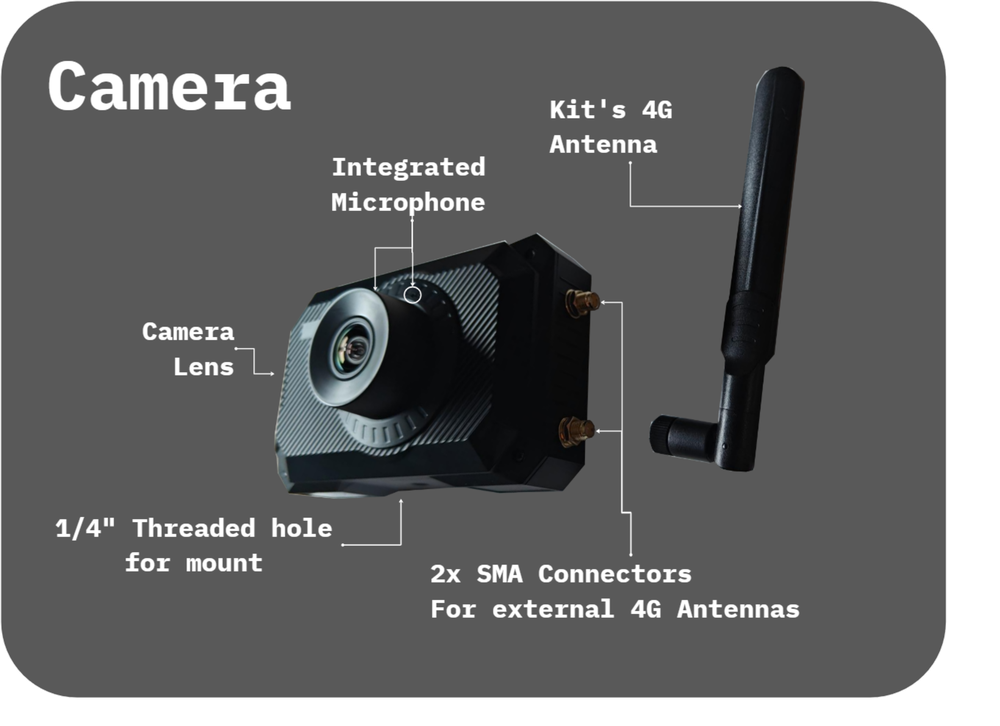
MineA5 Camera with external 4G Antennas
Connecting your camera to a local WiFi
If you’re using a local WiFi network instead of a 4G network, you can connect your camera to the WiFi as follows:
Click on the “Settings” (gear icon)
Navigate to General > Network > WiFi and enable the WiFi
Select your local WiFi from the list and enter your WiFi password
Mounting the Camera in your car
Mount the camera onto the roll cage using the provided clamp
If you decide to mount the camera upside down, make sure to flip the video in the camera settings.
Setting Up the Audio
Plug in the external microphone to the side (microphone input)
Click on the “Audio Level” bars (left side of the touch screen) to enter the audio settings
Under External Mic: set volume to 80%, make sure it’s “ON” (red color)
Under Inner Mic: make sure it’s OFF (not red)
Make sure the “Audio Level” bars are moving up when you talk into the external mic
Tip
Secure the microphone away from any wind flow using the rubber band or zip ties (avoid squeezing the cable too much)
Tip
Position the microphone somewhere in the car that is less exposed to wind.
Note
The audio from the external microphone will be used in the live stream, while the audio from the internal mic will be recorded locally on the camera and can be used as a backup
Controlling the Camera Remotely
Confer Live streaming with the MINE A5 using the MLive phone app for instructions on how to control your camera remotely using the MLive app.
Streaming with the MyRaces.Live platform
Confer Scheduling Your First Test Stream for instructions on how to stream to the MyRaces.Live platform.
Setting Up Auto-Recording
The MineA5 can record a local backup of the video footage on a Micro SD/TF card, which is highly recommended as a backup in case of any streaming issues.
Confer Start/Stop and Auto-Start Recording for instructions on how to set up auto-recording.